Retrieve the Name of the Requester
In this exercise you will learn how to retrieve the name of the requester from the request and add this request info in a note on the task.
What you really want to do is to get the information from the request and make it available on the approval task when the task is assigned to the approver (and not earlier, because the request info could have been changed).
Go back to the Records console, select the “Task Templates” option from the list of record types and select the task template “Reserve a Parking Space – Approval”.
On the task template, you will find a new section ‘Automation rules’ which is available for each task template with at least 1 automation rule. When you open the section, you will find the automation rule ‘Exercise 1 – Say Hello’.
For this exercise you will create a new Automation Rule. Click on the automation rules avatar on the right side of the ‘Automation Rules’ section and on the next “Automation Rules” screen click on the ‘+’ sign in the top right corner to add a new Automation Rule. Give it an appropriate title, for example 'Retrieve the Request Info'.
You will start by adding a better definition of the condition than the one in the previous exercise. Set the Trigger to On status update.
Create an expression with the name is_assigned and fill in status = assigned.
You may guess that the expression ‘is_assigned’ is true whenever the status of the task becomes ‘Assigned’. Now enter the expression, is_assigned, in the condition field which makes sure that this rule will only be triggered when the status of the task is changed, and the new status is ‘Assigned’.
Next, you will access the request.
In 4me, a request is a record. Other records are tasks, workflows, configuration items (CIs), organizations, sites, people. A record in 4me has attributes. A request, for example, is requested for someone. That person can be found in the ‘requested_for’ attribute of the request. In 4me, you will use the expressionrequest.requested_for. A task in 4me is always linked to a workflow and a workflow can be linked to 1 or more requests. For the ‘Reserve a Parking Place’ workflow, you know it will be linked to one request only. The set of all requests that are linked to a workflow is called a collection. To get the collection of all the requests of a workflow, you simply specifyworkflow.requests. Other examples of collections are all the tasks linked to a workflow (workflow.tasks), all the CI's linked to a task (task.cis) or to a request (request.cis) and all the approvals linked to an approval task (task.approvals). But you are not interested in all the requests, you just want the first one. To get one record, you need to specify which one you need. This can be done by specifying the index between square brackets. To retrieve the first request from a workflow you writeworkflow.requests[first]orworkflow.requests[1]. To get the last request from a workflow you can writeworkflow.requests[last]. And to get the first CI that is linked to a task you can writetask.cis[first]
Now that you understand how to get records and attributes, you can start building your automation rule.
Add a new expression request with the value workflow.requests[first]. When entering the data, you will see that the color of each word remains in red until the word is recognized as a record or an expression.
The next step is to get the name of the person for whom this request is made (‘Requested for’ person). Add a new expression requester with following value request.requested_for. This retrieves the person record. Next you need to retrieve the name, which is an attribute of the person record. You add a new expression requester_name. The value for this expression is the attribute requester.name.
request |
workflow.requests[first] |
requester |
request.requested_for |
requester_name |
requester.name |
Questions:
How can I find out which attributes are available for a record?
When you select the name of a record followed by a dot ‘.’, a pop-up window with the available attributes is displayed. To get an idea of all the attributes of a record and their meaning, you can have a look in the developer documentation . For example, look here for the attributes of a Request.
Remark: not all the attributes of a record are available in the automation rules.
Could you get the name of the requester with 1 expression only?
Yes, it is possible to define the expression ‘requester_name’ with this one statement workflow.requests[first].requested_for.name . However, splitting up the statement into 3 expressions has the advantage that debugging is much easier. For each line in the automation rule you will find a line in the automation trace with one line per result.
Now you need to define the action: you will add a note to the task telling the approver which user a parking place is required for. Select the action ‘Add a note’ with the following text in the ‘Add note field’:
| Update | current record |
| Add note | Reserve a parking place for user {{requester_name}} |
Your automation rule should now look like this:
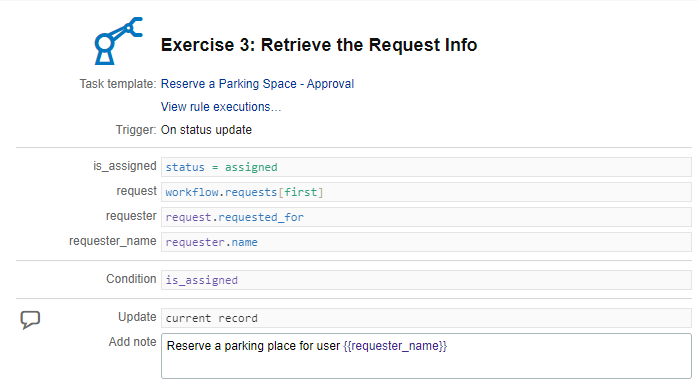
Save your automation rule and register a new request for Adam Blackburn to test the new rule.