Working with UI extensions
In this exercise you will learn how to retrieve information defined in an UI extension of the request and make this info available in a UI extension on the task.
You will need to make some request information available to the approval task. On the request form, the details of the reservation were defined in UI extensions (From, Until, License plate and the Site). Each field in a UI extension has a unique id. To retrieve the values of a UI extension field you need to know this unique id.
Let’s have a look at the HTML of the UI extension ‘Parking Space Reservation Details’. Goto the settings console and select the UI Extensions menu. Select the UI extension ‘Parking Space Reservation Details’ and have a look at the HTML:
<div class="row vertical">
  <label for="from" title="From">From</label>
  <input id="from" type="text" autocomplete="off"
         class="required date-time">
</div>
<div class="row vertical">
  <label for="until" title="Until">Until</label>
  <input id="until" type="text" autocomplete="off"
         class="required date-time">
</div>
<div class="row vertical">
  <label for="license_plate" title="License Plate">
    License Plate
  </label>
  <input id="license_plate" type="text" autocomplete="off"
         class="required add-to-subject">
</div>
<div class="row vertical">
  <label for="site" title="Site">Site</label>
  <select id="site" class="required">
    <option value=""></option>
    <option value="21">
      Boston - Widget Research and Development Center
    </option>
    ...
For each field on the UI extension, the id tag gives the unique id you need to know in your automation rule. On the approval task, another UI extension has been defined, with exactly the same HTML code and unique id’s. With our automation rule, you will copy the UI extension values from the request to the task.
In 4me, the UI extension values are stored in an attribute called custom_fields. To get or set a UI extension field you will use a statement, request.custom_fields.unique_id . You will continue with the same automation rule from exercise 3. Add the following expression to get the ‘from’ date:
from |
request.custom_fields.from |
Add 3 other expressions ‘until’ , ‘license_plate’ and ‘site’, and give them the value of the UI extension fields of the request. This becomes:
until |
request.custom_fields.until |
license_plate |
request.custom_fields.license_plate |
site |
request.custom_fields.site |

To set these values on the approval task, you need to add 4 actions. Hover over the “Add action” line. To the right side you will find the “Add update action” action (pencil icon).
You want to update this approval task, so leave the Update field as current record. An ‘Add update action’ has 4 action types. For the update of a single attribute, you need the default action type Set.
In the action field you will tell 4me to assign the correct value to the UI extension fields. For example, you will set the UI extension field ‘From’ to the expression ‘from’ that you previously defined, which contains the custom fields from the request. The action will look like this:
| Update | current record |
| Set | custom_fields.from = from |
Repeat this for the 3 other fields (until, license_plate and site).
| Set | custom_fields.until = until |
| Set | custom_fields.license_plate = license_plate |
| Set | custom_fields.site = site |
Your automation rule should now look like this one:
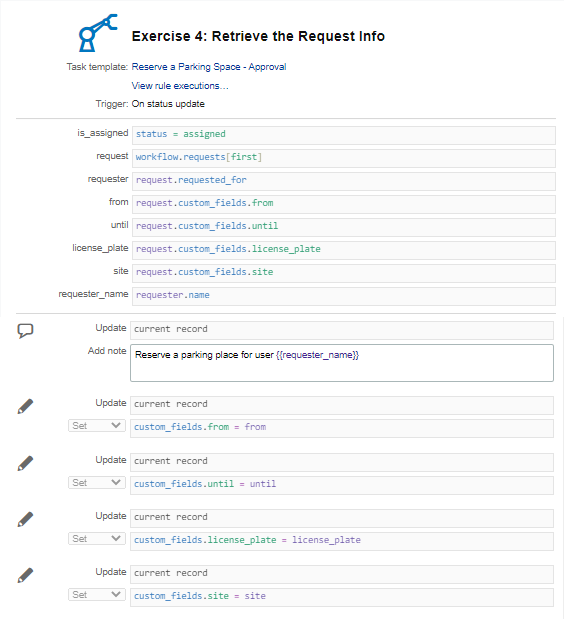
Save your automation rule and test.