Conditional Canceling of Tasks
In this exercise you will learn how to cancel a task based on a condition. You will build a ‘workflow template automation rule’, that allows you to modify a workflow.
In our parking reservation scenario, the ‘Reserved’ sign is only required for reserving parking space at the Chicago site. For the other sites the tasks “Reservation of Parking Space – Set ‘Reserved’ Sign” and “Reservation of Parking Space – Remove ’Reserved’ Sign” should be canceled.
In the previous exercises you have built automation rules with actions on the task itself or on the related workflow or request. These automation rules are called Task Template Automation Rules. In this exercise, you need an automation rule that will be triggered when the first task of the workflow is assigned and that will update (and get access to) 2 other tasks in the same workflow.
Question:
Why don’t you cancel the tasks as soon as these tasks get assigned?
When you cancel the tasks when their status gets assigned, the assignment team will receive an assignment notification. When a team member clicks on the assignment notification, he will see that the task is already canceled (or if he is very fast, he might even start to edit the task while the automation rule to cancel the task is still running). Both situations are to be avoided.
When you need to access or update other tasks in the same workflow, you need Workflow Template Automation Rules. In this example you will build a workflow template automation rule on the Automation task: when the Automation task gets assigned and when the selected site is not Chicago, you will cancel the 2 tasks.
Question:
Why didn’t you use a Workflow Template Automation Rule in the previous exercise, to reschedule the 4 tasks once the approval task is set to status approved?
It is a valid alternative. The advantage is that only one automation rule would be required to update the 4 tasks. However, when the same task template with the same automation rule needs to be used in more than one workflow workflow, a task template automation rule is the better choice.
In summary, there are 2 reasons for using a Workflow Template Automation Rule instead of a Task Template Automation Rule:
# When you need to manage other tasks in the same workflow;
# When the automation rule will only be used in the given workflow.
![]()
To create a Workflow Template Automation Rule, go to the Records console and select the “Workflow Templates” option from the list of record types. Select the “Reservation of Parking Space” workflow template and open the Gantt Chart of the workflow template.
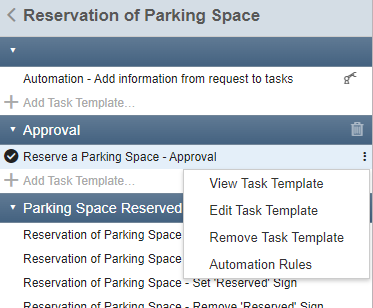
When you hover your mouse cursor over one of the task templates, a ‘3 vertical dots menu’ appears to the right. Clicking on the Automation Rules menu item allows you to add one or more automation rules for this task template. Keep in mind that the workflow template automation rules you add to a task template are limited only to the workflow template in which you do this. So other workflow templates to which the same task template is linked will not be affected.
Open the automation rules for the “Automation” task template. In the “Automation Rules” window, click on the ‘+’ sign in the top right corner to add your first Workflow Template Automation Rule. Specify ‘Conditional Canceling of Tasks’ as the name.
This automation rule is based on 2 conditions. For the first condition, when this task gets the status approved, you know what to do:
is_assigned |
status = assigned |
The second one is based on the site selection, which is a UI Extension field on the request.
Let’s have a look at this UI extension field HTML code:
<div class="row vertical">
  <label for="site" title="Site">Site</label>
  <select id="site" class="required">
    <option value=""></option>
    <option value="21">
      Boston - Widget Research and Development Center
    </option>
    <option value="20">Chicago - Widget Manufacturing Center</option>
    <option value="17">Houston - Widget Data Center</option>
    <option value="19">
      New York - Widget International Headquarters
    </option>
  </select>
</div>
You already know that you can get the UI extension value with custom_fields.site. The value you will get is however not the text that is displayed on the form (e.g. ‘Boston – Widget Research and Development Center’, but the HTML value, for the Boston site ‘21’.
For this UI extension, the values of the respective options (’21, ‘20’, ‘17’ and ‘19’) are the ID’s of these sites in 4me! This makes it possible now to look-up the site in 4me and check the real 4me site name. This is done with a formula of this type:
find(site,id)
where id is the 4me ID of the site you are looking for. If this site is not found, the formula will return a predefined expression nil, which means, ‘nothing found’. If the site is found the formula will return the site record, as defined in 4me. Once you have found the site, you can get the attributes of the site with site.name or site.custom_fields.ui_extension_field_id.
It is also useful to know that you can use the find(record_type,id) function for other record types too. For example:
find(person,id)
find(ci,id)
find(service_instance,id)
For this use case, you need to know if the site is the manufacturing site, based in Chicago. This can be achieved with the operator contains, which is self-explanatory: the statement expression contains ‘New York’ will return true (or false) if the expression does (or does not) contain the phrase New York. Now add all the lines to your automation rule to establish the expression is_manufacturing, which will be true if the site is the manufacturing site.
request |
workflow.requests[first] |
site_id |
request.custom_fields.site |
site |
find(site, site_id) |
site_name |
site.name |
is_manufacturing |
site_name contains ‘Manufacturing’ |
You can now set the condition for this rule. It consists of 2 parts: the approval task must have been approved and the site must not be the manufacturing site. With the operators and and or, it is possible to build-up a condition with multiple parts. With the operator not or ! preceding an expression, you can specify that the expression must not be true. This becomes:
condition |
is_assigned and !is_manufacturing |
or
condition |
is_assigned and not is_manufacturing |
Now you need to cancel the tasks. You need to get the task records first.
There are 2 ways to get task records. The first one is to get a predecessor or successor task of the actual task. This can be done with the statement successors[first] or predecessor[last]. Or by using the name of the task template: successors[‘task_template_name’] or predecessors[‘task_template_name’].
However, in this example the task “Reservation of Parking Space – Remove ‘Reserved’ Sign” is not a successor of the approval task, and perhaps the sequence of the workflow will change in the future.
So, you will use the second method of getting the task records, which is by looking at the workflow. A workflow can be linked to multiple tasks. The statement to use is workflow.tasks[‘task template name’]. This becomes
set_sign_task |
workflow.tasks["Reservation of Parking Space - Set 'Reserved' Sign"] |
remove_sign_task |
workflow.tasks["Reservation of Parking Space - Remove 'Reserved' Sign"] |
Question:
Why did you use double quotes around the name of the task template and not single quotes?
You need to use quotes around the task template name, if not the sentence would be considered as an (unknown) expression and you will get an error. In this case, the sentence (the task template name) contains single quotes. Using single quotes surrounding the sentence would again give an error: the system could not distinguish between the single quotes ending the sentence and the single quotes which are part of the sentence. This can be resolved by surrounding the sentence with single quotes. Or , if you really want to use ‘surrounding’ single quotes, you can use a ‘\’ sign just before the single quotes: workflow.tasks['Reservation of Parking Space - Remove \'Reserved\' Sign']
Now you can go to the actions and cancel both tasks. When you manually cancel a task in 4me, you will set the status to ‘Canceled’ and you will need to add a note. The canceled task will get assigned to you (the ‘member’ field will be set to you). When automating an action, it is always good to perform the action manually to understand what the automation rule should do, in this case: setting a status and adding a note. Task Automation Rules and Workflow Template Automation Rules are run as the Workflow Manager of the workflow. This means that the member field of the task will be set automatically to the workflow manager.
Now you can add 4 actions, 2 for each of the tasks.
| Update | set_sign_task |
| Set | status = canceled |
| Add note | Task canceled: not a request for Chicago |
| Update | remove_sign_task |
| Set | status = canceled |
| Add note | Task canceled: not a request for Chicago |
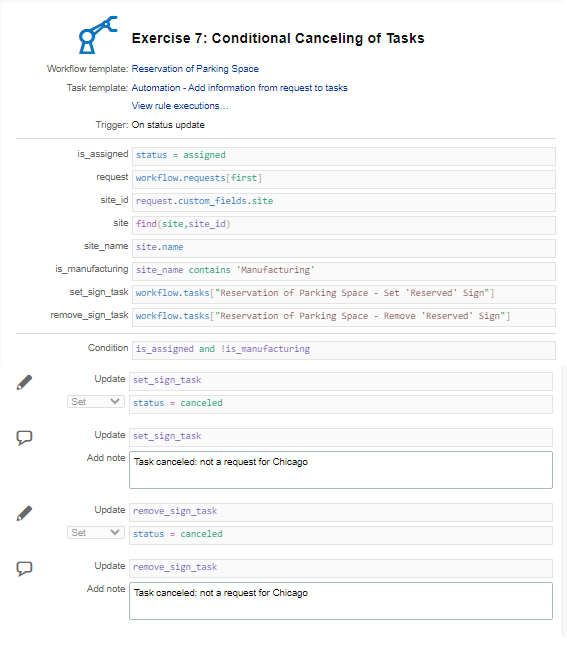
Your automation rules should now look like this: